I'm Pooped!-Gazebo Update

Spent all day yesterday finishing up the pictorial to sell on EBAY. Then half the night figureing out how to giet it listed properly. EBAY has changed thier rules and no longer allow electronic delivery.

It took me awhile but I believe I have figured out a work around. I think they figured you should be selling a tangible product. Something that can be tracked, not loaded with spyware and stuff. I'm assuming they may have had just one too many complaints about people buying things and not being able to recieve them.

Right in the middle of creating my first listing, I looked at the filesize of my pdf file. Way too big for email as it was around 10mb. I figured it was the pictures that where making it so big. What I did was take all the pictures and run them through an optimizer to compress them down about 50%. They still look pretty good and cut the file size down considerably. I think it's now down around 6.5MB or so.

No takers yet but I'm not suprised. learning how to list things and get results is an art. Unfortunately the learning curve can be costly. One of my keys to success will be little upfront cost. That way there is a little more room to pay EBAY's and PayPal's cut and still make some fair coin. And there is tons of room to workwith on the pictorial. Didn't cost anything but time to produce.

The good news is that because of my track record as a buyer...it gave me a jump start as a seller. I have the ability to use Buy-it-Now which is not available without a track record. Initially I though I was going to have to make 30+ sales to get to that status. 100% perfect feedback helps.

Gazebo

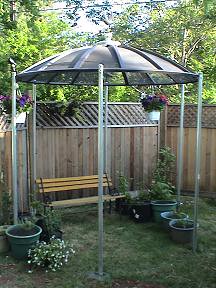
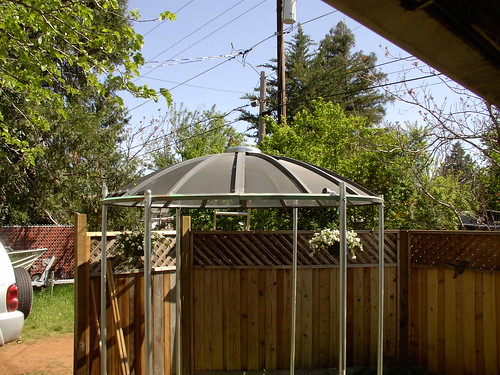
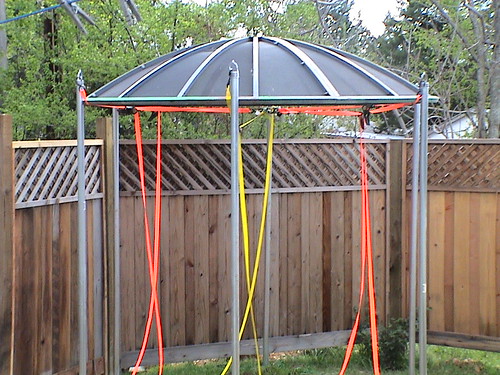
On the far right you will see my new tree I picked up at Wally World.  Its a cherry plum tree that's supposed to get to around 20 feet tall by 15 feet wide. Should provide plenty of shade someday for the gazebo if I get around to planting it.

Gazebo Update

DSC00144-web

Finally!

Took a little time today and weed whacked the work area and made the gazebo into usable space. We have several plants in pots ready to plant when I am. I need to get a picture in the morning light I think so the weathervane shows off a bit better. But the poles are all cut off and caps are on.

This completes phase one. Now I can finish my pictorial for selling on EBAY.

I've also been toying with an idea to add sun screens that should look really cool. I might just do a quick mock-up for a photo. Wally World has the screening I need.

To describe it, basically they would be cafe-type curtains that have ties to tie then to the post to create an archway effect with the plants hanging in the arch. They will also be able to be untied and then tied together to to close the archway between the poles.

Gazebo Update - Phase 1 almost complete

All that's left is to trim the tops of the poles and install the caps. I need to pickup 2 more solar lights for the top and install the yard light. I modified the weathervane a bit by making the shaft shorter. It was really meant to poke in the dirt anyway. The shaft from it pokes all the way through the gazebo to the underside. I figure I can McGyver some sort of loop or something to hang something on like an electric light even..who knows on that.

DSC00134

I took a break from painting the underside of the gazebo to take the shot since the light was good. Notice that it is no longer puke gray. I used Rustoleum Dark Bronze.

DSC00136

On of my poles was a "tad" off so I used my straps to pull it over before I bolted it in. Even though I thought it was ok before, the more I looked at it, the more it bothered me. So it was the last one to get fastenened. Little here, little there.

Gazebo Hot Tub!

I took a few minutes and did some searching on the Internet this morning. Learned a little about building a cheap hot tub. It seems my origional idea was basically sound. A lot of people have already done exactly what I had planned with variations of course.

Anyway my basic idea was doable!

It's really strange to come up with ideas on how to do something and find that someone else has been there done that. Even more so when the idea is sound.  My idea incorporates both wood heating and solar heating which would be a little more efficient. Neither system needs electricity. A lot of people have used a Rubbermaid horse trough in thier design. I'm, planning on a galvanized trough with a thin coat of truck bed liner sprayed into it which should be a little more ridged and afford freestanding on feet.

I'm stoked!

Gazebo Down For Repairs

In my earlier gazebo pics, you can see a rip in the screen if you look close. Today I lowered the roof back down to fix it and get ready to mount the weathervane...or at least get it ready to mount. Prior to actually mounting the weathervane permanently I need to paint the topside.

In my repair, I flattened the screen where it was buckled. I have a nice heavy irion thing I have been toting around for years..kind of a mini-anvil. My assistant held it on the underside and I gently pounded it from the top. Actually it laid down rather flat and the rip was bearly noticable.

I decided to take it one step further and solder it. Since the screen is acually a welded wire and not solderable, I took some bread ties and stripped the paper off. That gave me some very light wires to work with. At points along the rip, I workded the wire through the holes and twisted it. Then soldered the joint of the breadtie wire.

In the picture below you can make out the solder joints...the picture below that is from the underside. You can't see anything. Anyway a 1/2 Inch thick coat of paint will fix anything right? LOL

DSC00108

DSC00109

The glare of the sky and the trees distract the eye from the repair. You have to actually look real close to see it!

Gazebo Update

Mostly thought about what I am going to do next with the project. One thing missing was a cap for the very center at the top. A lot of gazebos you see have another smaller roof kind of thingy (not sure what it's called) at the peak of the roof. After a trip to the hardware store I came up with something finally.

IMG_0466

It's kind of hard to see but there is a galvnized garbage can lid with the handle removed at the peak of the roof. I'm not sure if I am going to raise it up on legs or not as of yet, but it's highly likely. After I figure out how to mount it, I can install the weathervane.

IMG_0473

I also modified a couple of pole caps, This one is the solar panel for the spotlight below.

IMG_0474

I've aimed the light into the tree. Thjought I would check it out tonight after dark. Since it's actually a spotlight, it may provide just enough light so I can see when I drive in after dark without shining in somebodys' window.

IMG_0475

The rim of the roof is actually hollow so eventually I will pull the wire through and hide most of it. I think the unit has around 20 feet of wire

Gazebo Update - Solar Lighting

OK remember this project is an "on the cheap" DIY. I've been playing around with some solar lights as an option for stuffing the tops of the poles and keeping the water out and add some environmentally friendly lighting. While my original attempt worked, I came up with an alternative that's a little more sexy. The photo was taken this morning at daybreak from the underside.

DSC00088

The other day I found some $5 white LED solar lights that are roughly 1/3 of the size of the other plastic solar lights you may find for the garden. I got 6 of them and poked them in the poles. The other larger amber lights, look and fit better but I wasn't really happy with the looks using these either .

What I ended up doing is just removing the head of the lights and placing them on top near the center of the gazebo. Since they are a low profile you cant see them easily from the outside. At night, it directs the light through the screen better than the lights on the poles do. Also directs the light more directly into the center where it is needed most.

At present, the light is very soft and subtle. I'll likely add a few more of these. They also have switches on them to turn them on and off unlike the other lights I have. This means I could vary the amount of available light by turning some of them off.  I may experiment a little with them and tie them into a single low-voltage dimmer switch accessible from underneath.

I also received my hummingbird weathervane. That I haven't installed yet. And I also haven't painted the roof yet either. So the lights can't be even semi-permanently mounted yet but I do have a plan for that also that will allow for easy removal if they need to be serviced at some point.

Not Too Old to Get it Up!

dsc00080

Took the day off today so I get rambunctious. Took a couple hours to slowly raise the roof on the gazebo project. I used 6 tie-down straps I wire tied to a steel ring. Didn't use the winching capability of the tiedowns. Just slowly pulled more slack through and then a couple clicks to secure it.

dsc00077

I also went to the hardware store down the street and bought my screws and bolts to fasten the roof to the poles. I basically have to make several of the pieces into the shape I need to make it strong and look good when it's done. that shouldn't take over about another hour I suppose. I changed my mind about painting yet. I need to paint the underside also and the total job shouldn't take any more than will fit in the spray gun.